Posts

Showing posts from May, 2023

Installing additional CSU

Image
Installing additional CSU Once you have done the above steps and in case you need to deploy an additional CSU, you need to only perform a small subset of the previously described steps to add your new Cloud POS's Url into the list of allowed Reply URLs. No changes are needed in any other places. To do that: 1. Navigate to  AAD Portal   2. Click   Azure Active Directory 3. Click on the tab   App Registrations  then click   All Applications .  4. In the search box type the name of the application, in the case of this demonstration that is  Customized Cloud POS,  and then click on the found application 5. Click the link next to the  Redirect URIs  with the label similar to  0 webs, 1 spa, 0 public client 6. Under the section  Single-page application  add the button  Add URI  and add the Url corresponding to your additional Cloud POS. Hit the  Save  button. Removing CSU When you no longer need a Cloud ...

Update F&O HQ configuration

Image
  Update F&O HQ configuration 1. In HQ UI go to  Commerce Shared Parameters  form (I think the fastest way to go there is to type that name in the search box and hit [ENTER]) then click there  Identity Providers  tab, then locate a row with the provider type  Azure Active Directory  and the  issuer  pointing to  *your*  AAD tenant. If you don't see the issuer corresponding to your tenant ID then you first need to add one click the "+" button in the topmost grid and then specify these values: Issuer :  https://sts.windows.net/ ReplaceThisWithTheGuidCorrespondingToYourAadTenant / Name : put there anything you want which will help you identify this record, you can put, for instance, the name of your Azure Active Directory Type : Azure Active Directory Note that the value of the issuer is case sensitive and everything there must be lowercased, also make sure to specify the trailing slash Once you located/added the iss...

Update Cloud POS configuration

Image
  Update Cloud POS configuration Now, let's update Cloud POS's config to point to the newly created AAD application 1. Click the  Overview  link of the just created Cloud POS AAD application and copy to the clipboard the value from the field  Application (client) ID 2. Open CPOS's config.json and locate where the key  AADClientId is . Replace its value with the one stored in the clipboard in the previous step.  3. In the same file find the key  AADRetailServerResourceId  and replace its value with the value corresponding to   Retail Server's  Application ID URI  created in step 1.5. Both of those parameters will be used by Cloud POS when it sends a request to AAD to acquire a security token. This is what my file looks like after making the changes: By now we completed the changes on the AAD and CPOS sides, next step is to add info corresponding to just created AAD applications into an allow list in HQ so RS will ...
Image
  Create Cloud POS AAD Application 1. Click "Azure Active Directory" 2. Click on the tab App registrations then click New registration. Provide values for the fields: - Name put anything you want here, for instance: Customized Cloud POS - Supported account types/Who can use this application or access this API? Leave the default option - Accounts in this organizational directory only - Redirect URI (optional) Select Single-page application (SPA) in the Drop-down and *your* Cloud POS Url in the textbox. Note, the value of the reply Url is case sensitive, therefore make sure to copy here the same value which will be used by the users accessing Cloud POS in their Web Browsers. In some cases the browser might append the trailing slash to the Url and in some not, to provide your users a better experience, register both of the URLs - one with the trailing slash and one without it. You should have something similar to: 3. Click the Register button. 4. Click Token Configuration and th...

Retail Server AAD application

Image
 Create a Retail Server AAD application 1. Login into AAD Portal by using any account in your AAD - the user doesn't have to be an Administrator. 2. Click Azure Active Directory 3. Click on the tab App registrations then click New registration. Provide values for the fields: - Name put anything you want here which will help you identify the purpose of the application later, for instance: Customized Retail Server - Supported account types/Who can use this application or access this API? Leave the default option - Accounts in this organizational directory only - Redirect URI (optional) - do not add any and leave it as is 4. Click the Register button. 5. Click the link Add an Application ID URI. At the top of the page click Set near Application ID URI. Accept the suggested value by clicking the Save button. Take note of this value - you will need it later while registering this Retail Server application within HQ. 6. Click Add a scope and provide values for the scope: - Scope name...

How to configure Cloud POS to use your own Azure AD application

How to configure Cloud POS to use your own Azure AD application  Table of Contents Introduction 1. Create Retail Server AAD application 2. Create Cloud POS AAD Application 3. Update Cloud POS configuration 4. Update F&O HQ configuration 5. Installing additional CSU 6. Removing CSU Introduction      Cloud-hosted Commerce Scale Unit (CSU) includes a Cloud POS automatically set up to work with Azure AD Application managed by the Microsoft team hosting the CSU. This applies to both types of Cloud-based CSUs: Sandbox and Production. In case you plan to use Cloud POS in any  other CSU deployment topology,  you need to register an AAD application in your tenant and set it up with your instance of Cloud POS and F&O. These topologies include:    1.  On-Prem Scale Unit Installer    2. IaaS-based Sandbox/Dev/Test/Demo environments The High-Level steps are: a) Create a pair of AAD Applications (Cloud POS and Retail Server) in your AAD T...

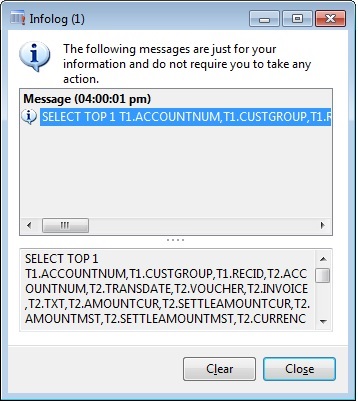
Get from X++ QUERY to get SQL query using getSQLStatement() for trouble shooting Dynamics AX 2012

Image
  getSQLStatement   is a new method that has been introduced in tables in AX 2012. Use   getSQLStatement()   method to get the SQL query from the X++ query to use for trouble shooting. The X++ select has been extended with the  generateonly  command that instructs the underlying data access framework to generate the SQL query without actually executing it. Code Example: static void getSQLQuery(Args _args) { CustTable custTable; CustTrans custTrans; select generateonly firstOnly AccountNum, CustGroup from custTable join custTrans where custTrans.AccountNum == custTable.AccountNum; info(custTable.getSQLStatement()); }